This article serves as a comprehensive guide for developers looking to enhance their Python applications by implementing auto-scaling for Celery workers using KEDA and Redis on a Kubernetes environment. It starts with an introduction to Celery, a distributed message processing system, and Redis, a popular database that acts as a broker for Celery tasks. The article walks you through setting up a sample Python app that uses Celery for task management, highlighting how Redis Lists support scalable consumer-producer patterns. It then delves into the workings of KEDA (Kubernetes Event-Driven Autoscaler), explaining how it can dynamically scale Celery workers based on the number of tasks in the Redis queue. A detailed Kubernetes deployment specification is provided to ensure a seamless setup of the application components. Furthermore, the article includes a testing section where you can simulate high-load scenarios to observe the auto-scaling behavior of Celery workers, thereby offering insights into optimizing application performance. Finally, it concludes by summarizing the advantages of using KEDA for auto-scaling and provides cleanup instructions to efficiently manage your Kubernetes resources. Whether you’re a seasoned developer or new to Kubernetes, this article equips you with the knowledge to implement a robust auto-scaling solution for your Python applications.
Introduction to Celery and Redis
In this section, we will explore the basics of Celery, a distributed message processing system, and Redis, a widely used database. Celery is designed to handle the orchestration of communication between clients and workers by leveraging brokers like Redis. This setup allows for the efficient distribution and processing of tasks, making it an ideal choice for applications that demand scalability and reliability.
Redis is renowned for its support of a variety of data structures, including Strings, Hashes, and Lists, among others. This versatility makes Redis an excellent choice for applications that require scalable architectural patterns. One of the key features of Redis that we will focus on is the Redis List. Redis Lists are pivotal in implementing the consumer-producer pattern, which is essential for background job processing with Celery.
Redis Lists and the Consumer-Producer Pattern
The consumer-producer pattern is a classic architectural model used to manage tasks in a distributed system. In this pattern, producers generate tasks and push them into a queue, while consumers (or workers) pull tasks from the queue and process them. Redis Lists serve as the backbone for this pattern by acting as the queue that holds the tasks.
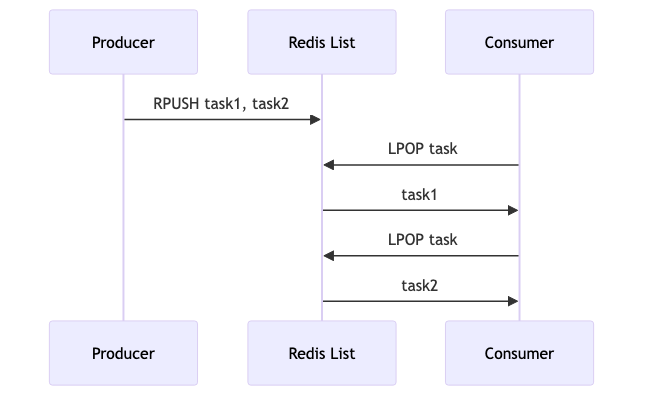
Here’s a simple example to illustrate how Redis Lists can be used in this context:
import redis

# Connect to Redis
client = redis.StrictRedis(host='localhost', port=6379, db=0)

# Producer adds tasks to the Redis List
client.rpush('task_queue', 'task1')
client.rpush('task_queue', 'task2')

# Consumer retrieves tasks from the Redis List
task = client.lpop('task_queue')
print(f"Processing {task}")
In this example, the producer adds tasks to the task_queue using the RPUSH command, while the consumer retrieves tasks using the LPOP command. This simple mechanism enables Celery to efficiently manage task distribution and processing across multiple workers.
Redis Lists not only provide a straightforward mechanism for task queuing but also support operations like trimming and blocking, which can be leveraged to optimize task processing and resource utilization. This makes Redis an excellent choice for applications that require high throughput and low latency, such as real-time data processing and asynchronous task execution.
As we delve deeper into this blog, we will see how Celery and Redis work together to enable auto-scaling of Celery workers using Kubernetes-based Event Driven Autoscaler (KEDA), ensuring that your application remains responsive and efficient under varying workloads.
Setting Up a Sample Python App with Celery
In this section, I will guide you through setting up a sample Python application that leverages Celery for efficient task management. We’ll cover the essential components needed for the application, focusing on configuring Celery with Redis as the broker. This step-by-step guide will include code snippets illustrating how tasks are defined and executed asynchronously, providing a practical foundation for understanding Celery’s capabilities.
Prerequisites
Before diving into the code, ensure you have the following installed:
- Python 3.6 or later
- Redis server
- Celery
Project Structure
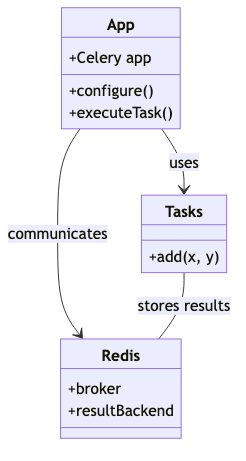
Let’s start by setting up a basic project structure:
my_celery_app/
    ├── app.py
    ├── tasks.py
    ├── celeryconfig.py
    └── requirements.txt
Step 1: Installing Dependencies
First, create a requirements.txt file with the necessary Python packages:
celery==5.4.0
redis==5.2.1
Install the dependencies using pip:
pip install -r requirements.txt
Step 2: Configuring Celery
Create a celeryconfig.py file to configure Celery settings:
# celeryconfig.py

# in container
broker_url = "redis://:abc123@redis:6379/0"
result_backend = "redis://:abc123@redis:6379/0"

# localhost
# broker_url = "redis://:abc123@localhost:6479/0"
# result_backend= broker_url

broker_transport_options = {
    "visibility_timeout": 3600,  # 1 hour
}

result_backend_transport_options = {
    "retry_on_timeout": True,
}

task_default_queue = "default"

task_queues = {
    "low_priority": {
        "exchange": "low_priority",
        "routing_key": "redis.low_priority",
    },
    "high_priority": {
        "exchange": "high_priority",
        "routing_key": "redis.high_priority",
    },
    "default": {"exchange": "default", "routing_key": "redis.default"},
}
This configuration specifies Redis as both the broker and the result backend, allowing Celery to use Redis for task communication and result storage.
Step 3: Defining Tasks
In the tasks.py file, define a simple Celery task:
# tasks.py

import time
from celery import Celery

app = Celery("tasks")
app.config_from_object("celeryconfig")


@app.task
def add(x, y):
    time.sleep(1) # Simulate task execution time
    print(f"Adding {x} + {y}")
    return x + y
Here, we define a basic task add that takes two arguments and returns their sum. The app object is configured using the settings from celeryconfig.py.
Step 4: Running the Celery Worker
To run the Celery worker, execute the following command in your terminal:
celery -A tasks worker -Q low_priority,high_priority --loglevel=info
This command starts a Celery worker process that listens for tasks defined in the tasks.py file. The --loglevel=info flag ensures that you receive informative logging output.
Step 5: Executing Tasks
Finally, let’s create an app.py file to execute the tasks:
# app.py

from tasks import add

results = []
for i in range(1, 500):
    result = add.apply_async((i, i), queue="high_priority")
    results.append(result)

print("Waiting for results")

for result in results:
    print(result.get())
This script imports the add task and executes it asynchronously using the apply_async method. The result is retrieved using the get method, allowing you to access the task output.
Conclusion
With these steps, you have set up a basic Python application using Celery and Redis. This setup provides a foundation for building more complex task management systems, allowing you to scale and optimize your applications effectively.
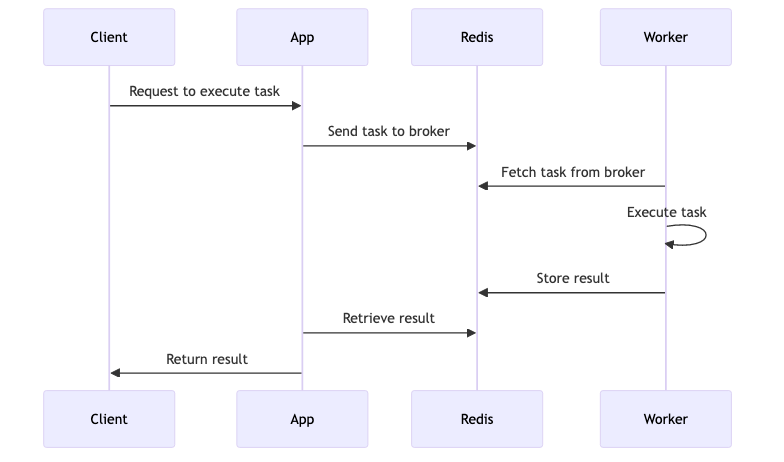
By following this guide, you gain a practical understanding of how to set up a Python application with Celery, enabling you to explore more advanced features and configurations in future projects.
Understanding KEDA for Auto-Scaling
KEDA (Kubernetes Event-Driven Autoscaler) is a powerful tool designed to manage the scaling of Kubernetes applications by responding to event metrics. Unlike traditional scaling mechanisms that rely on resource-based metrics like CPU and memory usage, KEDA operates on event-driven metrics, allowing for more granular and responsive scaling actions.
KEDA’s Architecture and Integration
KEDA builds on top of existing Kubernetes primitives, extending the capabilities of the Horizontal Pod Autoscaler (HPA) to include event-driven metrics. It introduces the concept of scalers—components that integrate with external systems to fetch metrics and drive scaling decisions. For instance, when scaling Celery workers, KEDA can monitor the length of a Redis task queue and adjust the number of worker pods accordingly.
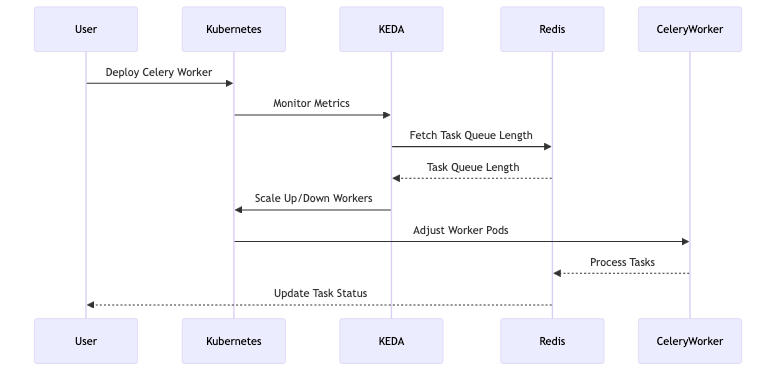
Here’s a high-level overview of how KEDA integrates with Kubernetes:
-
Scalers: These are responsible for connecting to external event sources, like Redis, to retrieve metrics. Each scaler is tailored to a specific event source, allowing KEDA to support a wide variety of applications and services.
-
ScaledObjects: These are Kubernetes custom resources that define the scaling behavior for a particular application. They specify the target deployment, scaling triggers, and parameters like polling intervals and replica counts.
-
Metrics Adapter: KEDA includes a metrics adapter that exposes custom metrics to Kubernetes, enabling the HPA to use these metrics for scaling decisions.
Auto-Scaling Celery Workers with KEDA
In the context of a Celery application, KEDA can be particularly effective. Celery, a distributed task queue system, often uses Redis as a broker to manage task distribution among workers. By leveraging KEDA, you can automatically scale your Celery workers based on the number of tasks queued in Redis.
To achieve this, a KEDA scaler is configured to monitor the length of the Redis list that Celery uses to queue tasks. When the number of pending tasks exceeds a specified threshold, KEDA increases the number of Celery worker pods. Conversely, when the task queue is empty, KEDA scales down the workers, optimizing resource usage.
Below is a simplified example of how a ScaledObject might be configured for a Celery worker deployment:
apiVersion: keda.sh/v1alpha1
kind: ScaledObject
metadata:
  name: redis-scaledobject
  namespace: default
spec:
  scaleTargetRef:
    kind: Deployment
    name: celery-worker
  pollingInterval: 3
  cooldownPeriod: 10
  maxReplicaCount: 10
  minReplicaCount: 1
  triggers:
    - type: redis
      metadata:
        address: redis.default:6379
        password: abc123
        listName: high_priority
        listLength: "10"
In this configuration, the triggers section specifies that scaling decisions should be based on the length of the Redis list named “celery”. The listLength parameter sets the threshold for scaling actions, ensuring that a new worker pod is created for every 10 pending tasks.
By using KEDA, you can ensure that your Celery workers are efficiently scaled according to the workload, minimizing idle resources and reducing costs.
Kubernetes Deployment Specifications
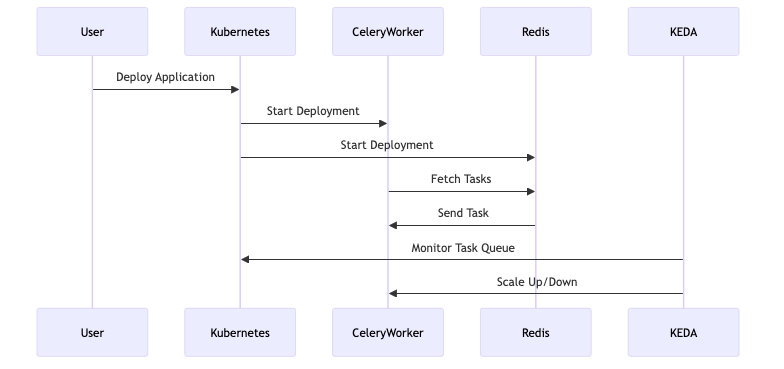
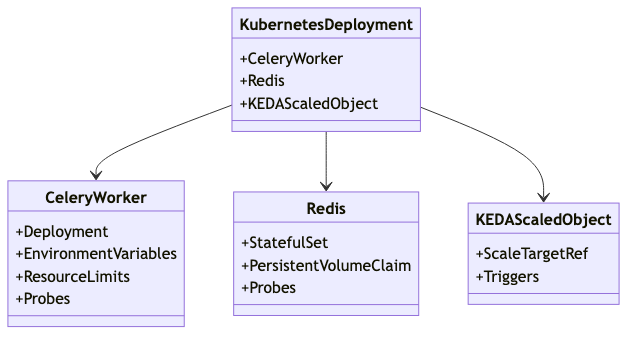
Deploying a Python application that utilizes Celery, Redis, and KEDA on Kubernetes requires precise configurations to ensure seamless integration and efficient auto-scaling. This section provides a comprehensive Kubernetes deployment specification for these components, focusing on optimal configurations for the Celery worker, Redis instance, and the KEDA ScaledObject. The objective is to establish a robust deployment process that supports auto-scaling based on task queue metrics, ensuring scalability and resilience.
Celery Worker Deployment
To deploy the Celery worker on Kubernetes, you need to define a Deployment resource that specifies the container image, environment variables, and resource limits. Here is a sample YAML configuration for a Celery worker:
apiVersion: apps/v1
kind: Deployment
metadata:
  name: celery-worker
  namespace: default
spec:
  replicas: 1
  selector:
    matchLabels:
      app: celery-worker
  template:
    metadata:
      labels:
        app: celery-worker
    spec:
      containers:
      - name: celery-worker
        image: thinhda/redis-auto-scaling:v0.7.0
        env:
        - name: REDIS_HOST
          value: "redis"
        - name: REDIS_PASSWORD
          value: "abc123"
        resources:
          requests:
            memory: "128Mi"
            cpu: "100m"
          limits:
            memory: "512Mi"
            cpu: "500m"
Redis Deployment
For Redis, you will need a StatefulSet or Deployment with a PersistentVolumeClaim to ensure data persistence. Here’s a basic example:
apiVersion: apps/v1
kind: Deployment
metadata:
  name: redis
  labels:
    app: redis
  namespace: default
spec:
  replicas: 1
  selector:
    matchLabels:
      app: redis
  template:
    metadata:
      labels:
        app: redis
    spec:
      containers:
        - name: redis
          image: redis:latest
          ports:
            - containerPort: 6379
          resources:
            requests:
              memory: "64Mi"
              cpu: "50m"
            limits:
              memory: "256Mi"
              cpu: "200m"
          livenessProbe:
            tcpSocket:
              port: 6379
            initialDelaySeconds: 30
            periodSeconds: 10
          readinessProbe:
            tcpSocket:
              port: 6379
            initialDelaySeconds: 5
            periodSeconds: 5
          command: ["redis-server", "--requirepass", "abc123"]
Beside, we have to define service for Redis to make it accessible from other components.
apiVersion: v1
kind: Service
metadata:
  name: redis
  namespace: default
spec:
  selector:
    app: redis
  ports:
    - protocol: TCP
      port: 6379
      targetPort: 6379
KEDA ScaledObject Configuration
The KEDA ScaledObject is crucial for enabling auto-scaling based on the Redis task queue length. Below is a configuration example:
apiVersion: keda.sh/v1alpha1
kind: ScaledObject
metadata:
  name: redis-scaledobject
  namespace: default
spec:
  scaleTargetRef:
    kind: Deployment
    name: celery-worker
  pollingInterval: 3
  cooldownPeriod: 10
  maxReplicaCount: 10
  minReplicaCount: 1
  triggers:
    - type: redis
      metadata:
        address: redis.default:6379
        password: abc123
        listName: high_priority
        listLength: "10"
Additional Considerations
- Network Policies: Implement Kubernetes Network Policies to secure communication between the Celery worker and Redis.
- Persistent Storage: Ensure Redis uses a PersistentVolumeClaim for data persistence.
- Monitoring and Logging: Utilize tools like Prometheus and Grafana for monitoring, and ELK Stack or Fluentd for logging.
By following these configurations, you can deploy a Python application with Celery, Redis, and KEDA on Kubernetes, ensuring that your application scales efficiently and remains resilient under varying loads.
Testing Auto-Scaling of Celery Workers
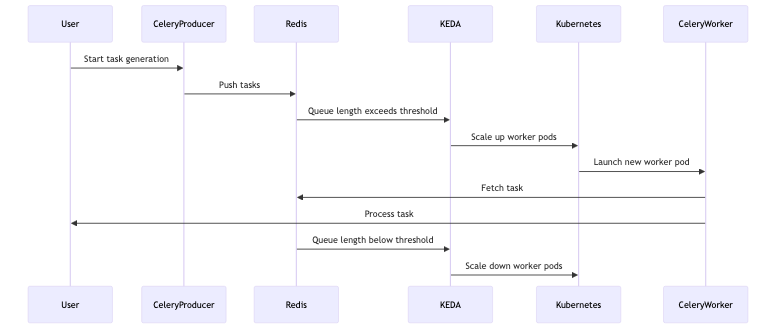
Testing is crucial to verify the auto-scaling functionality of Celery workers. In this section, we describe a comprehensive test setup to simulate high-load scenarios and observe the scaling behavior. We will guide you through running a Celery producer application to generate tasks and monitoring the scaling of worker pods. This hands-on approach will help you understand how KEDA manages scaling in real-time, providing insights into optimizing your application’s performance.
Setting Up the Test Environment
To begin testing, ensure that your Kubernetes cluster is up and running with KEDA installed as described in the previous sections. You will also need a running instance of Redis configured as the broker for Celery.
Running the Celery Producer
First, let’s simulate a high-load scenario by running a Celery producer application that continuously pushes tasks into the Redis queue. We already have app.py to execute tasks, so we can use it as the producer.
Before running the producer, we have to forward the Redis port to the local machine to be able to connect to it.
kubectl port-forward svc/redis 6479:6379
Replace broker_url and result_backend with the following in celeryconfig.py:
broker_url = "redis://:abc123@localhost:6479/0"
result_backend= broker_url
Monitoring Celery Worker Pods
Once the producer is running, switch to your Kubernetes terminal and start monitoring the the scaling events of the Celery worker pods:
kubectl describe hpa keda-hpa-redis-scaledobject --namespace default
Sample output:
Running HPA events
Name:                                               keda-hpa-redis-scaledobject
Namespace:                                          default
Labels:                                             app.kubernetes.io/managed-by=keda-operator
                                                    app.kubernetes.io/name=keda-hpa-redis-scaledobject
                                                    app.kubernetes.io/part-of=redis-scaledobject
                                                    app.kubernetes.io/version=2.16.1
                                                    scaledobject.keda.sh/name=redis-scaledobject
Annotations:                                        <none>
CreationTimestamp:                                  Sun, 19 Jan 2025 11:16:28 +0700
Reference:                                          Deployment/celery-worker
Metrics:                                            ( current / target )
  "s0-redis-high_priority" (target average value):  0 / 10
Min replicas:                                       1
Max replicas:                                       10
Deployment pods:                                    1 current / 1 desired
Conditions:
  Type            Status  Reason            Message
  ----            ------  ------            -------
  AbleToScale     True    ReadyForNewScale  recommended size matches current size
  ScalingActive   True    ValidMetricFound  the HPA was able to successfully calculate a replica count from external metric s0-redis-high_priority(&LabelSelector{MatchLabels:map[string]string{scaledobject.keda.sh/name: redis-scaledobject,},MatchExpressions:[]LabelSelectorRequirement{},})
  ScalingLimited  True    TooFewReplicas    the desired replica count is less than the minimum replica count
Events:
  Type    Reason             Age                  From                       Message
  ----    ------             ----                 ----                       -------
  Normal  SuccessfulRescale  49m (x2 over 55m)    horizontal-pod-autoscaler  New size: 8; reason: external metric s0-redis-high_priority(&LabelSelector{MatchLabels:map[string]string{scaledobject.keda.sh/name: redis-scaledobject,},MatchExpressions:[]LabelSelectorRequirement{},}) above target
  Normal  SuccessfulRescale  49m (x2 over 55m)    horizontal-pod-autoscaler  New size: 10; reason: external metric s0-redis-high_priority(&LabelSelector{MatchLabels:map[string]string{scaledobject.keda.sh/name: redis-scaledobject,},MatchExpressions:[]LabelSelectorRequirement{},}) above target
  Normal  SuccessfulRescale  44m                  horizontal-pod-autoscaler  New size: 4; reason: All metrics below target
  Normal  SuccessfulRescale  9m36s (x5 over 55m)  horizontal-pod-autoscaler  New size: 4; reason: external metric s0-redis-high_priority(&LabelSelector{MatchLabels:map[string]string{scaledobject.keda.sh/name: redis-scaledobject,},MatchExpressions:[]LabelSelectorRequirement{},}) above target
  Normal  SuccessfulRescale  9m21s (x4 over 44m)  horizontal-pod-autoscaler  New size: 8; reason: All metrics below target
  Normal  SuccessfulRescale  9m6s (x4 over 43m)   horizontal-pod-autoscaler  New size: 10; reason: All metrics below target
  Normal  SuccessfulRescale  4m35s (x3 over 25m)  horizontal-pod-autoscaler  New size: 1; reason: All metrics below target
You should initially see no running worker pods if the task queue is empty. As tasks accumulate, KEDA will start scaling up the worker pods based on the listLength threshold specified in the ScaledObject configuration.
Observing Auto-Scaling in Action
As tasks are added to the Redis queue, observe the number of worker pods increase:
- Scaling Up: KEDA will create additional worker pods as the task queue length exceeds the specified threshold.
- Scaling Down: Once the tasks are processed and the queue length drops, KEDA will gradually scale down the worker pods.
Verifying Task Processing
To verify that tasks are being processed, you can check the logs of the worker pods:
kubectl logs <pod_name>
Look for log entries indicating task execution, such as “Sending email to example@example.com”. This confirms that the worker pods are processing tasks from the queue.
Analyzing the Results
By observing the scaling behavior, you can gain insights into how well KEDA manages the workload. Consider experimenting with different listLength values and task generation rates to see how they affect scaling.
Fine-Tuning Your Setup
Based on the test results, you may want to adjust the pollingInterval, cooldownPeriod, and maxReplicaCount in the ScaledObject configuration to better suit your application’s needs. Additionally, ensure that your Redis instance is adequately provisioned to handle the load.
Through this testing process, you will gain a deeper understanding of KEDA’s capabilities and how to optimize your Celery application for dynamic scaling.
Conclusion and Cleanup
In this blog post, we’ve explored how KEDA can be effectively utilized to auto-scale Celery workers using Redis as a broker in a Kubernetes environment. By leveraging the capabilities of KEDA, we can dynamically adjust the number of Celery worker pods based on the workload, ensuring efficient resource utilization and cost management. This setup not only enhances the scalability of your Python applications but also simplifies the management of background tasks.
Key Takeaways
- Dynamic Scaling: KEDA allows for seamless scaling of Celery workers based on the task queue length, which helps in managing varying workloads efficiently.
- Resource Optimization: By scaling down to zero when there are no tasks, KEDA helps in minimizing resource usage, reducing operational costs.
- Flexibility: The system can be fine-tuned with parameters like
pollingInterval,cooldownPeriod, andmaxReplicaCountto meet specific application needs. - Integration: The use of Redis as a broker with Celery and KEDA demonstrates the power of integrating different technologies to achieve a robust auto-scaling solution.


