This article serves as a complete guide to understanding and implementing WebRTC, a technology that enables real-time communication directly in web browsers. Starting with an introduction to WebRTC, the article explains its importance in modern web development, highlighting its ability to facilitate video, audio, and data sharing without additional plugins. It then delves into the mechanics of how WebRTC works, including the signaling process and the role of the ICE framework in establishing connections. The handshake process is explained in detail, focusing on how peers securely connect and exchange media parameters. Additionally, the article covers the exchange of audio data streams, discussing the use of APIs and codecs to ensure high-quality communication. Practical implementation is supported with sample code, providing a hands-on approach to setting up WebRTC connections. Lastly, the article offers best practices for optimizing WebRTC applications, focusing on performance, reliability, and security. This guide equips developers with the knowledge and tools needed to effectively leverage WebRTC in their projects.
Introduction to WebRTC
Web Real-Time Communication (WebRTC) is a transformative technology in the realm of web development, offering the capability to perform real-time communication directly between browsers without the need for any plugins or third-party software. This open-source project has been a game-changer, enabling seamless peer-to-peer (P2P) audio, video, and data sharing across web applications.
Key Components of WebRTC
To grasp the full potential of WebRTC, it’s essential to understand its core components and how they interact to facilitate real-time communication:
RTCPeerConnection
The RTCPeerConnection is a fundamental building block in WebRTC, responsible for handling the transmission of media streams between peers. It manages the connection setup, maintenance, and termination, ensuring smooth media exchange. This component is crucial for enabling audio and video calls, making it a cornerstone of any WebRTC-based application.
RTCDataChannel
The RTCDataChannel provides a mechanism for bidirectional data transfer between peers. It’s designed to send arbitrary data, enabling use cases such as file sharing, gaming, and chat applications. This channel is established over the same peer connection used for media streams, ensuring efficient and synchronized data exchange.
STUN and TURN Servers
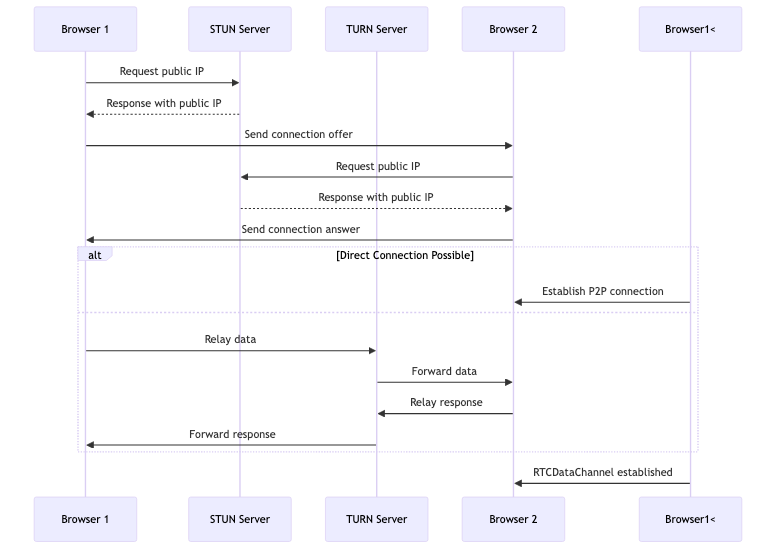
To establish a direct connection between peers, WebRTC relies on STUN (Session Traversal Utilities for NAT) and TURN (Traversal Using Relays around NAT) servers:
-
STUN Servers: These servers help peers discover their public IP addresses and the type of Network Address Translation (NAT) they are behind. This information is vital for establishing a direct connection.
-
TURN Servers: In scenarios where a direct connection cannot be established (due to restrictive NATs or firewalls), TURN servers act as relays, forwarding data between peers to ensure connectivity.
The Role of ICE
Interactive Connectivity Establishment (ICE) is a framework used by WebRTC to manage the connection process. It gathers multiple candidate connections and attempts each one to find the most efficient path for data transmission. Understanding ICE is crucial for optimizing connection reliability and performance.
WebRTC’s ability to operate within the browser environment without additional software requirements makes it an appealing choice for developers seeking to implement real-time communication features. As we delve deeper into WebRTC, we’ll explore how these components work together to create seamless and secure communication experiences.
How WebRTC Works
In this section, we delve into the mechanics of how WebRTC operates. WebRTC, or Web Real-Time Communication, is a powerful technology that facilitates peer-to-peer communication directly from your web browser. It achieves this through a combination of JavaScript APIs and network protocols, enabling real-time audio, video, and data sharing without the need for plugins.
Establishing a Connection
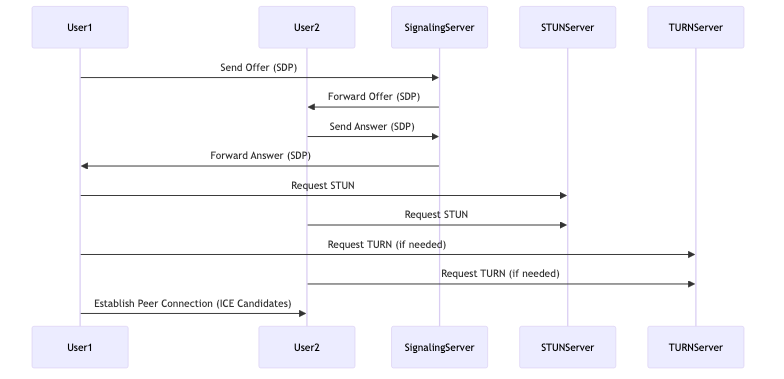
The process of establishing a connection between two peers in WebRTC involves several key steps, primarily centered around the signaling process. Signaling is the method by which peers exchange control messages to negotiate communication parameters such as network configuration and media capabilities. Although WebRTC itself does not define a signaling protocol, developers often use protocols like WebSockets or SIP (Session Initiation Protocol) to handle this exchange.
Signaling Process
-
Offer/Answer Model: This model is central to WebRTC’s signaling process, where one peer creates an “offer” describing its media capabilities and network information using Session Description Protocol (SDP). The other peer responds with an “answer,” also using SDP, to establish a mutual understanding of the session parameters.
-
Session Description Protocol (SDP): SDP is a critical component in the offer/answer model, containing information about media format, transport protocols, and other necessary parameters for establishing a connection. It ensures both peers agree on the media exchange details.
Interactive Connectivity Establishment (ICE)
Once the signaling process is complete, WebRTC employs the Interactive Connectivity Establishment (ICE) framework to determine the best path for media streams. ICE is responsible for gathering potential network paths, known as ICE candidates, and selecting the most efficient route for data transmission between peers.
ICE Candidates
- Host Candidates: These are the direct IP addresses of the peers.
- Server Reflexive Candidates: Derived from STUN (Session Traversal Utilities for NAT) servers, these candidates help in navigating NAT (Network Address Translation) devices.
- Relay Candidates: Obtained from TURN (Traversal Using Relays around NAT) servers, these candidates are used when direct peer-to-peer communication is not possible.
The ICE framework tests these candidates to establish the optimal connection path, ensuring minimal latency and robust communication.
Media Stream Exchange
Once the connection is established, WebRTC allows for the exchange of media streams. This involves encoding and decoding audio and video data, as well as managing the flow of data channels for non-media information. WebRTC’s use of secure protocols like DTLS (Datagram Transport Layer Security) and SRTP (Secure Real-time Transport Protocol) ensures that all data exchanged is encrypted and secure from potential threats.
By understanding these processes, you gain insight into the workflow that powers WebRTC’s real-time communication capabilities, allowing you to implement and optimize WebRTC solutions effectively.
The Handshake Process in WebRTC
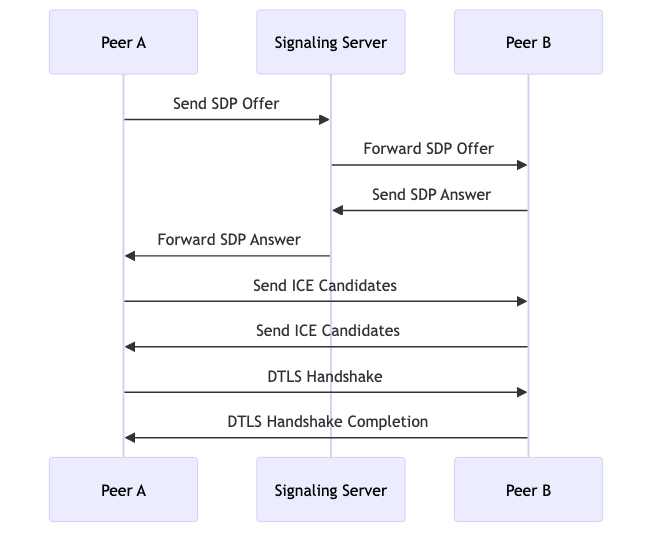
The handshake process in WebRTC is a critical step in establishing a secure and reliable connection between peers. This section will break down the stages involved in the handshake, from the initial offer and answer exchange to the role of the Session Description Protocol (SDP) in negotiating media parameters.
Initial Offer and Answer Exchange
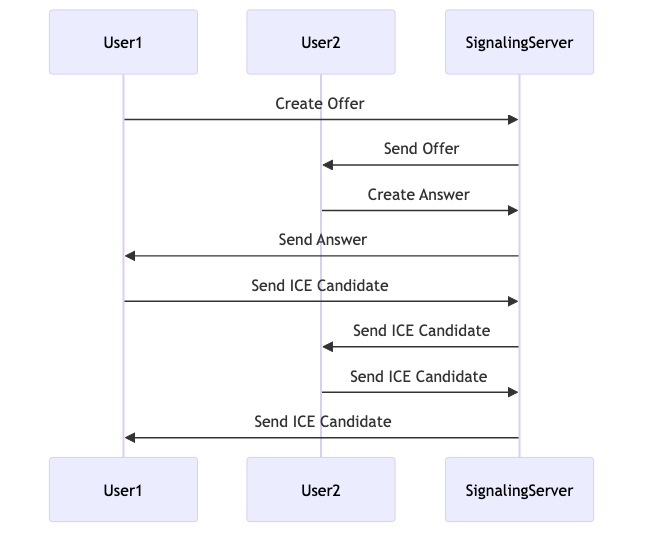
The handshake process begins with the exchange of SDP offers and answers between peers. This is facilitated through a signaling server, which acts as an intermediary to convey these messages. The SDP contains information about the media capabilities of each peer, such as supported codecs, media types (audio, video, data), and network information. Here’s a simple example of how an SDP offer might be created and sent:
# Create an RTCPeerConnection
peer_connection = RTCPeerConnection()

# Create an SDP offer
async def create_offer():
    offer = await peer_connection.createOffer()
    await peer_connection.setLocalDescription(offer)

# Send the offer to the remote peer via signaling server
# signaling_server.send(offer)
Gathering and Sharing ICE Candidates
Once the SDP offer and answer are exchanged, each peer begins the process of gathering ICE (Interactive Connectivity Establishment) candidates. ICE candidates are potential network paths that can be used to establish a peer-to-peer connection. The process involves:
- STUN Servers: Used to discover the public IP address and port of a peer behind a NAT.
- TURN Servers: Act as relays when direct peer-to-peer connections cannot be established.
The use of Trickle ICE allows candidates to be sent incrementally, reducing connection setup time. As candidates are discovered, they are shared with the remote peer:
# Listen for ICE candidates
@peer_connection.on('icecandidate')
def on_ice_candidate(event):
    if event.candidate:
        # Send the candidate to the remote peer via signaling server
        # signaling_server.send(event.candidate)
Security with DTLS-SRTP
After the ICE candidates are exchanged and a compatible pair is found, the connection is established. At this point, WebRTC uses DTLS (Datagram Transport Layer Security) and SRTP (Secure Real-time Transport Protocol) to encrypt the media streams. This ensures that the audio and video data transmitted between peers is secure and protected from eavesdropping.
Troubleshooting and Optimization
Understanding the intricacies of the handshake process is crucial for troubleshooting connection issues. Common problems include the failure to find a compatible ICE candidate pair or a DTLS handshake failure. Developers should implement error handling strategies such as retrying the connection, providing fallbacks like using TURN servers, and informing users of connection issues. Logging and monitoring can also help identify and resolve issues promptly.
By comprehending each stage of the handshake process, you can optimize your WebRTC applications for better performance and reliability.
Audio Data Stream Exchange in WebRTC
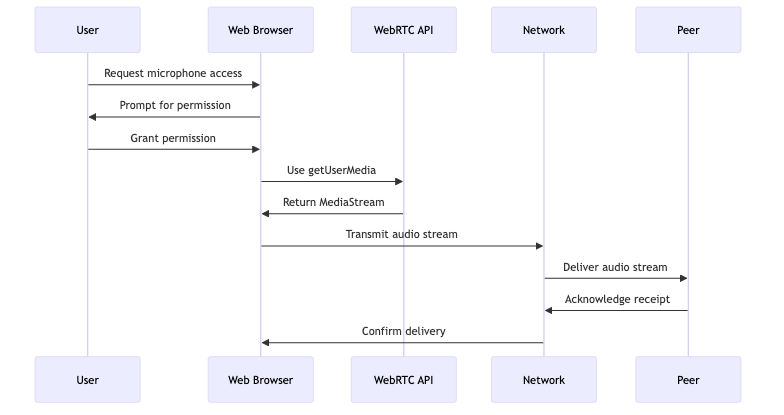
Audio streaming is a core feature of WebRTC, enabling real-time audio communication between peers. In this section, we’ll delve into the intricacies of how audio data is exchanged, focusing on capturing, transmitting, and managing audio streams to ensure a seamless user experience.
Capturing Audio with getUserMedia
The journey of audio data in WebRTC begins with capturing audio from a user’s device. This is accomplished using the getUserMedia API, which prompts the user for permission to access their microphone. Once granted, this API provides a MediaStream object containing the audio track.
Here is a basic example of how to capture audio using getUserMedia:
navigator.mediaDevices.getUserMedia({ audio: true })
    .then(function(stream) {
        // Use the audio stream
        const audioTrack = stream.getAudioTracks()[0];
        console.log('Audio track ready:', audioTrack);
    })
    .catch(function(err) {
        console.error('Error accessing audio media:', err);
    });
Transmitting Audio Over the Network
Once captured, the audio stream is prepared for transmission over the network. WebRTC uses several transport protocols to ensure secure and efficient data transfer. The Secure Real-time Transport Protocol (SRTP) is employed to encrypt audio streams, maintaining confidentiality and integrity during transmission.
Audio Codecs and Their Impact
WebRTC supports various audio codecs, with Opus and G.711 being the most common. The choice of codec can significantly impact audio quality and latency:
-
Opus: Known for its flexibility, Opus can adapt to varying network conditions, providing high-quality audio even at lower bitrates. It is suitable for a wide range of applications, from voice calls to music streaming.
-
G.711: A simpler codec that requires more bandwidth, G.711 is often used in environments where bandwidth is not a constraint. It offers lower latency but may not perform as well under fluctuating network conditions.
Handling Audio Interruptions
Network disruptions can lead to packet loss, affecting audio quality. WebRTC employs techniques such as Forward Error Correction (FEC) and Packet Loss Concealment (PLC) to mitigate these issues. FEC involves sending redundant data packets to recover lost ones, while PLC smooths out audio playback by guessing the missing data, ensuring a continuous audio stream.
Ensuring a Smooth User Experience
To provide a high-quality audio experience, developers should consider factors such as:
- Network Conditions: Opt for codecs that adapt to varying bandwidth and implement error correction techniques to handle packet loss.
- User Environment: Allow users to choose their preferred input devices and provide clear instructions for granting permissions.
- Testing and Optimization: Regularly test audio quality under different network conditions and optimize based on user feedback.
By understanding these concepts, developers can implement robust audio communication features in their WebRTC applications, enhancing the overall user experience.
Sample Code for WebRTC Implementation
A practical understanding of WebRTC is best achieved through hands-on experience. In this section, we’ll provide sample code snippets to demonstrate a basic WebRTC implementation. You’ll see how to set up a simple peer-to-peer connection, capture and transmit media streams, and handle signaling using WebSockets or other channels. The code examples will help solidify your understanding of the WebRTC concepts discussed earlier, offering a foundation to build more complex applications. By the end of this section, you’ll have the tools to start experimenting with WebRTC in your own projects.
Setting Up a Peer-to-Peer Connection
The first step in a WebRTC implementation is to establish a peer-to-peer connection between two clients. This involves creating RTCPeerConnection objects on both ends and exchanging connection details through a signaling server. Here’s a simplified example:
// Create a new RTCPeerConnection
const peerConnection = new RTCPeerConnection();

// Handle ICE candidate events
peerConnection.onicecandidate = event => {
    if (event.candidate) {
        // Send the candidate to the remote peer via signaling server
        signalingServer.send(JSON.stringify({ 'candidate': event.candidate }));
    }
};

// Handle connection state changes
peerConnection.onconnectionstatechange = event => {
    console.log('Connection state change:', peerConnection.connectionState);
};

// Create an offer to initiate the connection
peerConnection.createOffer()
    .then(offer => peerConnection.setLocalDescription(offer))
    .then(() => {
        // Send the offer to the remote peer via signaling server
        signalingServer.send(JSON.stringify({ 'offer': peerConnection.localDescription }));
    });
Capturing and Transmitting Media Streams
Once the connection is established, you can capture and transmit media streams. This involves using the getUserMedia API to access the user’s media devices and adding the media tracks to the peer connection:
navigator.mediaDevices.getUserMedia({ video: true, audio: true })
    .then(stream => {
        // Display the local video stream
        document.getElementById('localVideo').srcObject = stream;

        // Add the stream's tracks to the RTCPeerConnection
        stream.getTracks().forEach(track => peerConnection.addTrack(track, stream));
    })
    .catch(error => {
        console.error('Error accessing media devices:', error);
    });
Handling Signaling with WebSockets
Signaling is essential for exchanging connection metadata between peers. WebSockets are a popular choice for this task due to their real-time capabilities. Here’s a basic example of how signaling might be implemented:
const signalingServer = new WebSocket('wss://your-signaling-server.com');

// Handle incoming messages from the signaling server
signalingServer.onmessage = message => {
    const data = JSON.parse(message.data);

    if (data.offer) {
        peerConnection.setRemoteDescription(new RTCSessionDescription(data.offer))
            .then(() => peerConnection.createAnswer())
            .then(answer => peerConnection.setLocalDescription(answer))
            .then(() => {
                // Send the answer back to the remote peer
                signalingServer.send(JSON.stringify({ 'answer': peerConnection.localDescription }));
            });
    } else if (data.answer) {
        peerConnection.setRemoteDescription(new RTCSessionDescription(data.answer));
    } else if (data.candidate) {
        peerConnection.addIceCandidate(new RTCIceCandidate(data.candidate));
    }
};
These examples provide a starting point for building WebRTC applications. By understanding the core components and processes, you can begin to experiment and expand upon these basic implementations to suit your specific use cases.
Best Practices for WebRTC Implementation
To ensure the success of your WebRTC applications, it’s crucial to follow best practices. This section will outline key strategies for optimizing WebRTC performance and reliability.
Handling Network Fluctuations
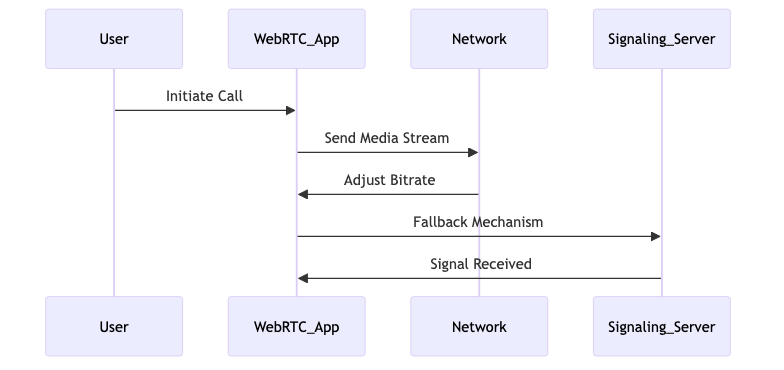
WebRTC applications often operate in environments with varying network conditions. To maintain a seamless user experience, consider implementing adaptive bitrate streaming. This technique dynamically adjusts the quality of the media stream based on current network conditions, ensuring smooth playback even when bandwidth fluctuates. Additionally, employing jitter buffers can help manage packet delays and reduce audio and video disruptions.
Robust Error Handling
Error handling is vital for maintaining the stability of WebRTC applications. Implementing comprehensive logging and monitoring tools like WebRTC internals can help identify and resolve issues quickly. Additionally, consider using fallback mechanisms for signaling servers to ensure continuous operation in case of server failures. Regularly test and simulate network failures to prepare your application for real-world scenarios.
Ensuring Cross-Browser Compatibility
WebRTC’s API implementation can differ across browsers, leading to inconsistencies. Utilizing libraries like Adapter.js can help normalize these differences, providing a consistent experience for users across different browsers. Regularly test your application on all major browsers to identify and address compatibility issues promptly.
Security Considerations
Security is paramount in WebRTC applications, given their real-time data exchange nature. Encrypt media streams using SRTP (Secure Real-time Transport Protocol) and ensure signaling messages are transmitted over secure channels like WebSockets over TLS. Additionally, manage user permissions carefully by providing clear prompts and options for users to control access to their media devices. Regular security audits and updates are recommended to protect against vulnerabilities.
Managing User Permissions
Balancing security with user experience involves providing intuitive permission prompts and allowing users granular control over their media devices. Ensure compliance with privacy regulations and regularly review permissions to protect user data.
By adhering to these best practices, you’ll be able to deliver seamless and secure real-time communication experiences to your users, setting your applications apart in a competitive landscape.


